
instruction
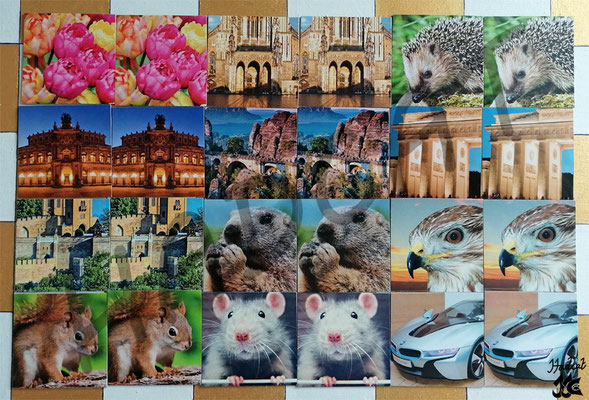
memory game from stickers 2013

materials
-
stickers: each motif twice
- cardboard, e. g. from old paper pads
- adhesive glitter foil
tools
-
pencil
- ruler
- scissors
costs
- stickers costs: incurred according to the value of the sticker and the number of cards
I used cheap old stickers from my collection and thus kept the cots low.
-
adhesive glitter foil = €1 - 2
working time
-
according to the number of memory cards: 3 - 5 hours
instruction
1. Draw a square template on cardboard and cut it out. This is how big your memory cards will be and the template will make them uniform.

2. Take the stickers.

3. Place the template on one sticker and trace it. Take the second sticker that is the same and place the template on the sticker as the first. Tip: Place the first sticker with the traced template next to the same second sticker as a reference to see which area you will use for the memory card.


4. Cut out the stickers.

5. Take the cardboard. If you use different cardboards, make sure that the thickness of the cardboards is always the same. Glue the cut-out stickers onto the cardboard and cut them out with the cardboard.

6. Stick the adhesive glitter foil on the back and cut off the overlap.
Your memory game is ready.
Variant for older children or adults
To make the memory game more exciting, you can also use combined motifs. This means that two memory cards are not identical, they form a motif together. Here are some examples:
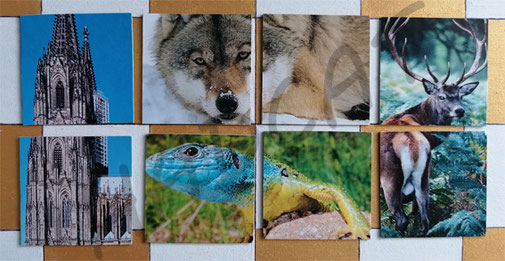
To create a continuous motif from two stickers, you can do the following: Place the template on the first sticker and trace it. Then place the two stickers next to each other and place the template on the second sticker exactly at the end of the first. You have a perfect pair of pictures.

