
instruction
Keyblade Oblivion 19/09/2008

materials
-
MDF board 8 mm: 40 cm x 110 cm
- air-drying clay from EFAPlast Light: 500 g (or 1000 g of normal heavy clay)
- waterproof acrylic paints 75 ml each: black, silver, white, gold, blue
- black chain: approx. 40 cm
- metal rings with 2 - 3 cm diameter: 2 pieces
- picture varnish gloss as spray paint
tools
- jigsaw
- drilling machine
- wood drill
- files
- pencil
- eraser
- tracing paper and possibly computer with image editing programme
- sandpaper
costs
-
MDF board 40 cm x 11o cm = €3.00
- EFAPlast Light 500 g = €11.00
You can also just use EFAPlast without Light. This is only half as expensive, but twice as heavy. Therefore you would have to buy 1000 g instead of 500g.
- acrylic paints 75 ml each = €1.50 per piece (in craft shops approx. €2-3)
- chain and metal rings = €1.50
- picture varnish gloss as spray paint = €10.00 (this will last for several projects)
- total = €33
working time
-
41 hours
weight
-
1 kg
instruction
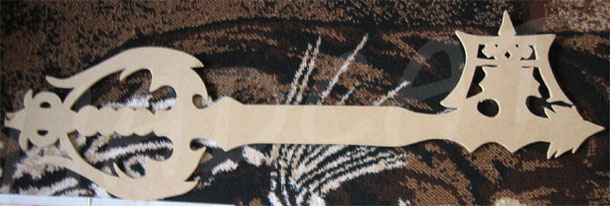
1. Take the MDF board and draw the Oblivion on it. You can also create a grid using an image editing programme. Herre are the exact
measurements:


2. Use a jigsaw to cut the Oblivion as close to the lines as possible. If you don't have a jigsaw yourself, you can ask your friends if they can lend you one.

3. To get to the small spots, drill holes and file away the rest with a file.

4. Attach a metal ring to both ends of the chain. Drill a hole at the end of the Keyblade and attach the chain to the hole using the
ring. You need to be a bit creative here, e. g. you can use a ring that can be opened with pliers. Leave the other end of the chain as it is for now.
5. Now comes the exciting part.
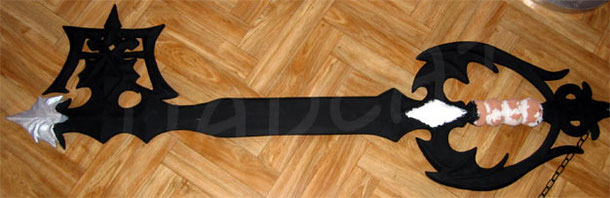
To make the Keyblade plastic, use EFAPlast and model it like the original (see pictures). To make attaching the EFAPlast easier, coat the board with a little water and let it dry briefly. You can also use a little water to smooth out the surface. Only use a little water, otherwise cracks will form as the EFAPlast dries.


6. Allow the EFAPlast to dry for 24 hours.
7. Carefully sand the irregularities with sandpaper. Only sand a little, as sanding roughens the surface!
8. Paint the Keyblade with waterproof acrylic paints. Start with the dark colours and paint the light colours over the dark ones as soon as the dark colours are completely dry. Try a test shade first to see if the light colours stand out enough. If they do not stand out sufficiently, paint over them several times. Let the individual layers dry in between.
9. Allow the colours to dry completly.
10. As protection, spray the Keyblade with picture varnish. To do this, it is best to go outside so that you do not inhale the varnish.
11. Lastly, the pendant is processed. To do this, you can print out a picture of the pendant that fits the size and place it on the MDF board as a template. Work on the pendant as you did with the Keyblade: saw out the pendant, file it, attach it to the chain, work on it with EFAPlast, paint it and spray it with picture varnish.

Voilá your Oblivion is ready.
tips
1. To smooth out the edge of the sword, work with small and large files.
2. Roll the EFAPlast into rolls with your fingers and then place it on the Keyblade and press it firmly. This is useful, for example, for the top or the diamonds. For the diamonds, simply cross two pieces of the roll and attach them to the Keyblade. Fill the open areas with EFAPlast. Your diamonds are ready.
3. Draw the silver lines by eye, they should be about 1 cm thick.
4. For the chain in the middle part, take a 30 cm long ruler and draw the chain with a pencil on one side of the board. Take several pages of tracing paper and transfer the chain to the other side. This way you will quickly have the chain on both sides.

5. How can you create a grid? Place a check pattern over your design to be traced. You can do this by hand or on the computer with an image editing programme.

Transfer a check pattern on the material where your motif will be painted. Now you can start tracing. Check box by box to see if the original
matches the traced pattern. This is a common method of transferring or enlarging motifs on other surfaces.
6. How do you transfer a design onto an object? First take a piece of tracing paper and trace the motif with a very soft pencil. Then turn the tracing paper over so that the pencil side is down. Place the tracing paper where you want the design to be and trace the design with a slightly harder pencil. This is the mirror-inverted version. If you want the non-mirror-inverted version, trace the motif again on the reverse side of the tracing paper and place this side on the motif spot. Remove the tracing paper and your motif is clearly visible. To see the lines better, you can now trace them by hand. As an alternative to tracing paper, you can also use translucent baking paper. This is cheaper.
